When you planned to create a blog or site, the prime concern is how the blog or site could be promoted or reaches the appropriate audience. As we know, the best method of promoting a blog is through various social networking sites; and the best among these are Facebook, Twitter, Google+ and many more. Through these sites one can drag or invite readers and create audience to their blogs. Here we’ll learn how to create a page in Facebook and how to promote the page to attract readers or audiences.
- Just log in to your Facebook account
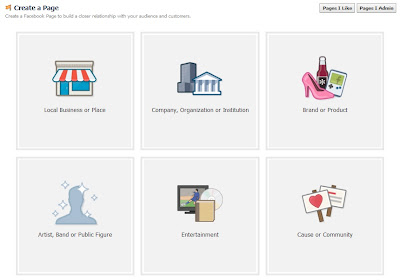
- Go to Pages option or you can find +Create a Page option on your home page also; click on that; see (IMG: 01)
 |
| (IMG: 01) |
- You’ll see various types of pages in that; click on Brand or Product to promote your website; then upload a profile picture (square size) of your page.
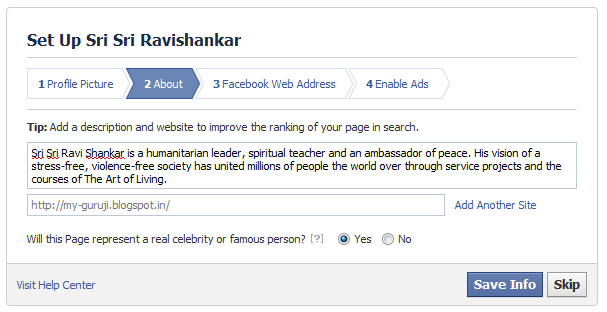
- In the ‘About page’, add a short description of your website and add the URL of website or blog in the given URL box; you can add more than one URLs by clicking on the ‘Add Another Site’ option. Click on ‘Save Info’ option to proceed. See (IMG: 02)
 |
| (IMG: 02) |
- Give a unique Facebook web address for your page and click on set address to proceed.
 |
| IMG: 03 |
- You’ll see an option as ‘Enable Ads’, to ignore that click on Skip button.
- Now your page is ready. Post some links of your blog or site on your new Facebook page and invite friends through the option provided in the Insight column of your page’s Admin Panel.
- Try to send more and more invitations to your Facebook friends and also from your Gmail, Ymail, or any other mail boxes.
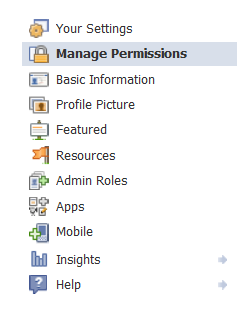
- Now click on the ‘Admin Settings’ option provided in Admin Panel; you’ll see various options such as: Your Settings, Manage Permissions, Basic Information, Profile Picture, etc. see (IMG: 03)
- Go to the Basic Information page and give the valid date of your website creation, a short description, website of your webpage/blog, email id, and other information which you think to share.
- Click on the ‘Featured’ option; where you can set your ‘Page Owner’ by clicking on the ‘Add Featured Page Owners’ button.
- Click on ‘Resources’ option, where you’ll see several options; such as Advertise on Facebook, Select a Username, Invite Email Contacts, Use Social Plugins, Link you page to Twitter etc.
- Click on the ‘Use Social Plugins’ option; next click on the ‘Like Box’ option which you’ve to show on your blog or site homepage.
- Now, in the Facebook Page URl option, paste the newly created Facebook Page’s URL; you’ll see the preview of your page in right side the column.
- Check out the ‘Stream’ option and see the changes; check in if you want to show the streaming of posts in that ‘Like Box’ otherwise check out. Similarly, check out the ‘Header’ option.
- Now see, is the width of the ‘Like Box’ is perfect for your blog column? Set or change the width value; no need to set the height value.
- Click on the ‘Get Code’ option to get the Java Script code of your page. You’ll see four types of plugin codes; HTML5, XFBML, IFRAME & URL; select the IFRAME and copy the code in a notepad file. See (IMG: 04)
 |
| (IMG: 04) |
 |
| (IMG: 05) |
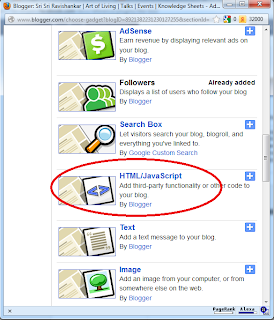
- In another window, open your blog’s dashboard; in the Layout option click on the ‘Add a Gadget’ option, where you’ll find an option as ‘HTML/JavaScript’. In that ‘configure HTML/JavaScript’ box, in Content Box paste the copied IFRAME code of your Facebook Page and save. See (IMG: 05)
- Now every time you created a post in your blog or site, just post the link of your post in your Facebook Page, so that the interested persons will know about your new postings and visit your site regularly.


No comments:
Post a Comment
Thanks for visiting my site
Naresh Behera